Добавить персонал ресторана
Last modified:
In order to employees of the establishment can work with the Waiter module it is necessary to add personnel to the system. There are two ways to do this:
Each employee has a role with access to certain program features.
Access rights
To work with staff in Waiter, you need the right to create and edit users, in the web panel, the "Write" right in the "Settings" section.
Role Description
Each role has its own set of rights – what the employee can and can not do, to which sections he has access. Rights are set by default, you can change them at your discretion.
- The manager has the maximum rights to work with orders, client and cash.
- The hostess meets guests at the entrance. Can create orders and reservations, close accounts.
- The cashier has access to all operations related to the cash (except for setting up): closing and paying accounts, working with clients and so on.
- An accountant has access to the cashier and accounts, as well as settings: adding printers, checks, and so on.
- Waiter and barman by default, can only close accounts. Their rights can be expanded.
- Only the cook’s screen is accessible to cook; in addition you can give access to the stop list.
Add Staff to Waiter
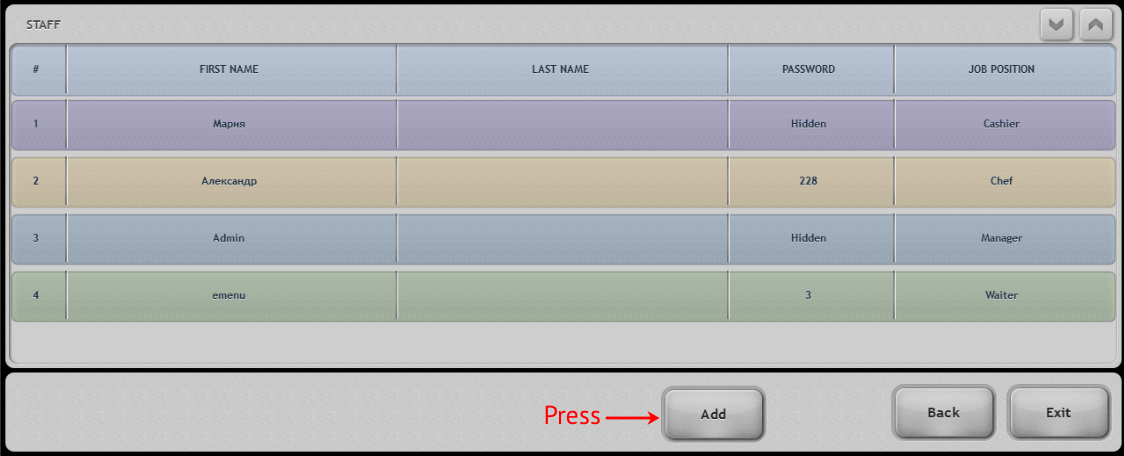
1. On the main screen, select "Staff" in the top menu.

2. A list of users will open. Click «Add».

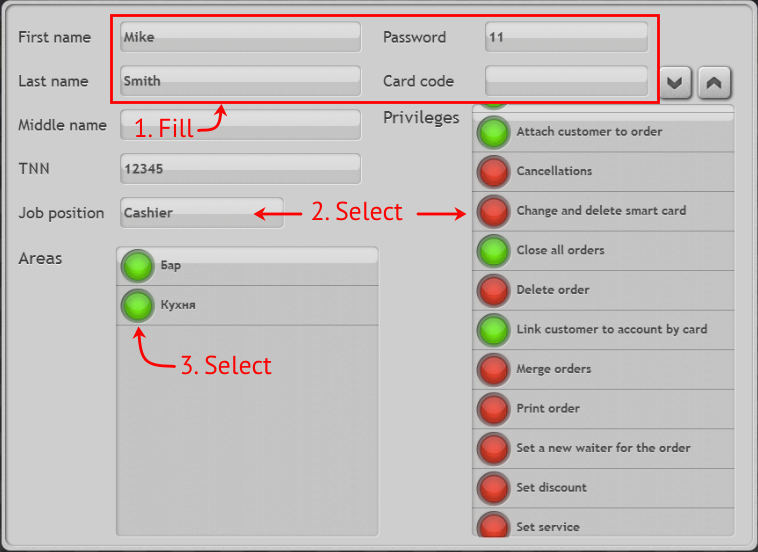
3. Fill in the users data:
- First name and surname;
- TIN – it is required to indicate for the cashier, in order to print number on the cash check;
- password – for manual login system;
- card code – pass an employee card through a card reader. So an employee will be able to authorize on terminal by passing a card through a card reader.
4. Select a position – a set of rights will be displayed automatically. Indicate which rights the employee will have.
Attention! The combination of the name and position of the employee must be unique.
5. Select which areas the employee will have access.

6. Save the user.
Done – the employee has been added to the system and can work with the terminal. To change or delete a user, simply click on his name in the list and select an action.
Add Staff to the Web Dashboard
1. On the "Settings" tab select "Staff".
2. Click "Add".

3. Enter the first name and surname of the user.
4. Indicate the password for entry and card code – this way the employee will be able to authorize on terminal by passing the card through the card reader.
5. Select a position from the list – a set of rights will be displayed automatically. Mark which rights the employee will have.
Attention! The combination of the name and position of the employee must be unique.
6. Indicate which departments the employee will have access.

7. Save the user by clicking "Create".
Done – the employee has been added to the system and can work with the terminal. To change or delete a user simply mark him in the list and select an action.